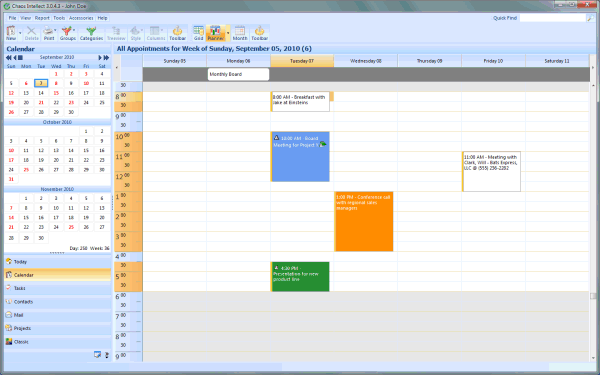
This view offers a time span of a Day, Week or Work Week. Your screen will look something like this:
This planner style allows you to create new appointments and reschedule or modify existing appointments by using both days and time slots.
If you click on a time slot and start dragging your mouse to select time, when you Add a New Appointment, the times are already filled out based on your selected time period.
 Rescheduling an existing Appointment for a different
day or time
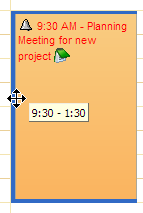
Rescheduling an existing Appointment for a different
day or timeAppointments in the planner view can be grabbed, dragged, and dropped on another time slot.
First, you need to click on the existing appointment to select it.
Next, click down and hold on to the thick border on the LEFT side of the appointment. When you are doing this correctly, you will see the 4-Arrow mouse pointer showing the item you are dragging can be moved in any direction.
As you move to other time slots, you will see a pop-up clock showing the new time slot you have selected should you drop the item where you have it.
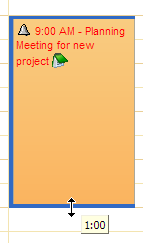
If you want to shorten or lengthen an existing appointment, you can click once on the appointment to select it, then grab the bottom or top border and drag to extend or reduce the time given to this item.
Notice that when you start dragging the border, there is a pop-up clock showing you the time you have moved the line to. Once you let go of the mouse, the appointment will be updated with the new start and end time.
If you have more than one database that you switch between, the Planner is also capable of showing availability without the switching back and forth!
On the top menu of the program, look for Tools, then Favorites. This opens an always-on-top window that lists all of the databases you normally switch between.
From this list of databases, you can select an icon representing a database you want to compare with, then drag that icon down and drop it right in the middle of your Planner. In addition to the appointments of the database you are already using, you will see an overlay of all of the start and end times from the second database you dragged and dropped to this planner.
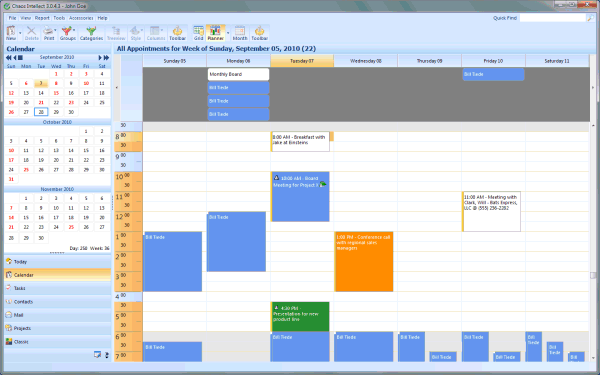
You won't see full details on the other databases but you will see availability, so you will know whether the time is available for a joint meeting. Once you find a time and add the meeting to your schedule, you can right click on it and send it to the other database to block off the time in both places.
Tip: The color that the additional databases show up in is controlled by each database. If you want to set the color used by your data, make sure you are in the right database, then go to Tools and Options, then look for Timeline Color for the setting for this database.
This help article applies to Intellect 3