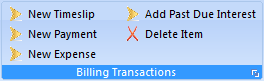
On the top bar of Legal Billing, there is a Billing Transaction settings to let you make new line-item entries for a client.
These options include
Choose one of these three types of transactions and a screen like this will appear for you to fill out.
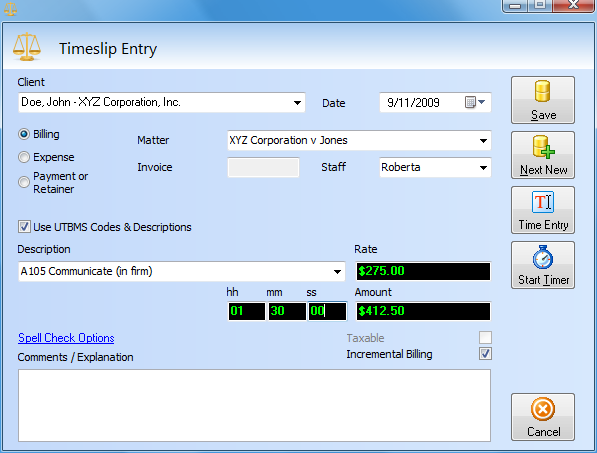
Client - This is the name of the client that this transaction will be assigned to. It is determined by the CLIENT NAME that is selected on the main report screen.
Date - Enter the date on which that activity was completed. The date defaults to TODAYS date according to the date and time on your computer system. The date format is selected based on your computers SHORT DATE FORMAT as set from within Windows Control Panel. Dates may be changed either by clicking the down arrow immediately next to this field and picking a date from the drop down calendar.
Matter - Generally, you can type what ever you wish in this field. Typically it would be a description of the case you are working on for the client, i.e. Jones v. Jones or numeric as in a file number. As you enter additional matters this drop down list will automatically populate with MATTER descriptions that you have previously used for this client so that you do not have to retype the whole description each time.
Invoice - Is by default a non-editable field and generally used for display purposes only. Invoice Numbers are automatically assigned to each transaction when you print an invoice. The invoice numbers start at 1001 and increment by 1. (If you want to change this default behavior, go to the Print Settings area.)
Description - Generally, you can type what ever you wish in this field, BUT it should be short and reusable phrases like Telephone Consultation or Court Fees. As you enter additional transactions this drop down list will automatically populate with Activity Descriptions that you have previously used so that you do not have to retype the whole description line each time. You should try to keep them brief as these will appear on the client invoice. It may be interesting to know that the 'drop down lists' are different lists for Billing Activities, Expense Items, and Payments. Further, Billing Transactions automatically store the associated Hourly Rate and will recall the rate automatically for subsequent transactions where the same activity description is used.
You should NOT put long explanations in the description field, but use the Comments section instead to track information that is unique to this transaction only.
Should you wish to delete an item from the drop down list, select the item from the list that you wish to delete and then click your delete button from your keyboard.
Billing Transaction Examples
Expense Item Examples
Use UTBMS Codes & Descriptions is an option to utilize the Universal Task-Based Management System codes promoted by the American Bar Association. This will strictly enforce your new entries to make sure you have picked a valid code from the dropdown list rather than typed something unique.
Rate - The Hourly Rate Field is used only for Billing activities. If you charge, for example, $200.00 per hour for an Office Consultation, then you would enter 200 in this field. This field supports the international currency as specified by your computer system under Regional Settings in Windows Control Panel.
HH MM SS - Hours Minutes Seconds are the three fields shown. This is used to record the DURATION of your billable activity. Use the tab key to quickly navigate between them. Alternatively should you be interested in entering time as a percentage of an hour, you will be pleased to know that the hours field will support this; for example entering .5 in the hour field would be recognized as 30 minutes
Amount - For expense items enter the total amount of the item. For billable items the total is a calculated field. It is calculated by multiplying the Hourly Rate with the activity duration. For payments, enter the amount received from the client (it should be entered as a positive amount).
Incremental Billing - You can set your minimum billing increment by selecting the PREFERENCES screen under the FILE menu of the Legal Billing Module. The actual rounding up operation occurs when you click the SAVE or NEXT NEW button. Incremental Billing rounds up the duration automatically to a predefined setting. For example, an attorney might bill out his or her time in 15 minute increments. This would round up a four (4) minute Telephone Consultation to 15 minutes, or a 38 minute Office Consultation to 45 minutes. If you bill utilizing a minimum increment of .1 (one-tenth of an hour), then enter "6" (six) in minimum billing in PREFERENCES.
If the INCREMENTAL BILLING box or the TAXABLE box is grayed out, it is because you have not set your minimum billing increment or the taxes increment in SETTINGS. If you have selected the INCREMENTAL BILLING feature and/or the TAXES feature in SETTINGS and you want to disable it for a particular entry or a set of entries, then click on the INCREMENTAL BILLING box and/or the TAXABLE box and the check mark(s) will disappear. This change is only temporary.
Comments - Any comments that you wish to annotate to a transaction can be placed here. Generally, they are intended to act as a reminder for your purposes and to provide additional depth into this transaction. This comments field will accept a maximum of 30,000 characters if you wish to type that much! They do not print on the client statement by default unless you select the option to include comments from the view menu on the main screen of the program.
Save - The SAVE button should be selected in order to save your transaction to the databases. This applies to both new and edited transactions. It will save your changes and then close the transaction entry screen.
Next New - This button will save the current transaction and allow you to enter the next transaction without having to return to the main screen. This control feature is very handy if you are entering several transactions for the same client one after another.
Start Timer - If you want to record the duration of a telephone conversation or the length of an office visit, then this is the button for you. The Timer functions allow you to Start, Stop and Pause a timer. As the timer is running it is constantly calculating the duration multiplied by the hourly rate to display the total charge. Optionally, while the timer is running you can have a BEEP sound occur on each elapsed minute to help remind you that the timer is active. This option is available by selecting SETTINGS under the FILE menu.
Start/End Time - Select this button to have The Legal Billing Program calculate the duration from a start and end time. For example, a client consultation from 2:15pm to 4:30pm would calculate a duration of 2 hours and 15 minutes.
If you have selected incremental billing, the duration of the activity will be calculated using the incremental formula.
Cancel - The cancel button completely abandons a new record or changes to a transaction edit without saving the entry.
This help article applies to Legal Billing 6 Help